Monday, December 29, 2008

Update 11

Welcome to update 11.
I hope each of you had a great Christmas.


Last week, Santa brought N8419 a sheet of stainless steel. I turned it into some covers for the rudder and brake pedals.


I first had to assemble the finger brake, but I think they turned out pretty nicely.

Here's hoping for a safe New Year's celebration for everyone.

I'm finished posting for the year, I'll see you in 2009!

Monday, December 22, 2008

Update 10

This post brought to you by:

Snowblower!

Having managed to dig my way into the door, I thought I should post about last weeks activity.


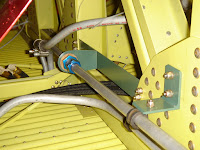
As my faithful readers may recall, the brake master cylinder reinstallation was pretty much squared away, save the plumbing. Now the plumbing is finalized.


The spacers are on the way, and when installed, It will be time to bleed the brakes.

I made a pattern for enclosing the pedals and cylinders. Stainless steel is on the way, and will make for an attractive and functional enclosure.


In other areas, the oil tank standpipe fitting is now installed. (doesn't look any different, you say?)

You would be correct. It doesn't, but there's nothing quite like wrestling with 1" hose in a confined space... Does anyone have an ice pack?


I'll take this opportunity to wish all my loyal (and occasional) readers a Merry Christmas!

Monday, December 15, 2008

Update Number 9

This week's update brought to you across the windswept tundra of central Michigan.


last week saw the #1 oil tank mounting system get revamped to facilitate it not resting directly on the engine mount structure. It required some trial and error, as well as ingenuity, but then, what task hasn't ?


The primer lines were re-routed to the proper configuration and new flex line fabricated prior to installation of the exhaust system. The exhaust (surprise) required some fitting and massaging to make itself at home on the engine.


I discovered some fittings with a "Ford" look to them, and sure enough, after communicating with Bruce, my suspicions were confirmed.

They are the standpipes for the engine oil system. I was wondering why there were none... Now to install them. The #3 engine will be easy enough, but #1's oil tank outlet is guarded by a bunch of "snakes".


As far as installing the various oil, fuel and vent lines, some repairs have been necessary:


Yeah, that's not such a good looking hose/tube joint


That's much better


In other news, while I have been taking a break from the brakes, (not really. I've been noodling about them continuously, short of having nightmares about them) I now have a legitimate solution to the hose routing issues.


That's much nicer

And it moves well too boot!


I want to let you all know that I really appreciate all the kind words that I get about the progress on this fantastic project.

Monday, December 8, 2008

Update 8

Good morning Trimotor fans. Today we have for your review the following:


yes, the #1 engine is really starting to take shape. Quite honestly, it looks as though a large amount of progress has taken place, simply due to the addition of the oil tank and oil cooler. The truth is that those were relatively simple tasks, whereas hunting down enough wires


to make the engine run takes somewhat longer. Speaking of hunting wires down, the pilot's switch panel is all wired up and checked out.

Now back to the oil tank:


These spacers are larger than they should be, causing the oil tank to impinge on the aft portion of the nacelle structure. I'll have it fitting properly before the day is done, after which, I'll be on to the next task.

Monday, December 1, 2008

Update 7

Ok, so the time has come to hang accessories on the engines. Here's a pic of the progress:

Doesn't really look like much, does it? While changing the fittings over, replacing hose, fighting with installing adel clamps does soak up some time and effort, there really is a lot of stuff coming together there.

Not to worry, by the end of today the shiny yellow oil tank will rest in it's home.


In other news, the wiring continues in the cockpit area.


Looks like a bigger mess? Maybe, but I know where they go now. For the most-part, that is. And the prints will actually match the plane now, which will be great for the next soul to work N8419.

By the way, the #2 engine oil tank does fit...

No worries there, aside from the fittings. I'm confident that I can make them work though.

All in all, progress is , um progressing at the pace I thought. N8419 is right on schedule.

Monday, November 24, 2008

Update 6

This week I have some exciting things for you to see.


Yes, N8419 now has engines!


Two of them to be exact.
The #2 or "center" engine will be installed after the firewall is finished, as well as a bunch of plumbing.


Also, I'll find out if the oil tank will fit through the engine mount, or if I need to remove the mount, install the oil tank, and install the mount. Anybody??


In other, less fantastic news (to many) the wiring jungle is slowly being turned into pasture...


When it's done it should look more like a putting green (to continue the vegetation analogy)
One day, an old gentleman stopped by to reminisce about old airplanes, and asked me with concern in his voice, "how do you know where it all goes?" He also mentioned, astonished, that "that mess looks like the inside of my TV!"
I take it he doesn't have a Solid State Television...

Also the engines are seeing stuff happening around them.

The various lines are finding their way back to the places in which they lived so long ago...
after a serious scrubbing, naturally!
Hoses and tubing and accessories, oh my!

Monday, November 17, 2008

Update 5

Last week found the Fuel Line supports finished and installed.


I've been torquing and marking the fuel line fittings as much as I can. (some will need to come back out to facilitate the installation of the fuel tanks)


I'm also replacing much of the flexible lines in the fuel system. More hose coming soon.

Engine fire seals were repaired in anticipation of engine installation.


And finally, certainly not least in the task list,


Wiring!

What fun! (The next guy to work on this will thank me...)

Monday, November 10, 2008

Update #4

Hello Trimotor fans. This post is brought to you by:
Coffee!

Last week saw the Dishpan repairs come to an end. Finally.


There is some amount of work that will be required to be done to the fire seals, as they have been cutting through the engine mount bolts. More on that later.


Andrew and Hazel finished robbing the old brackets from the spars last week, and the spars are gone back to the land of old spars as of this morning.


The brackets than can be used are being installed in the wing. There are still brackets needing fabrication, due to differences in the spar design, and that is occurring as well.


Until next time, happy flying!

Monday, November 3, 2008

Update 3

Hello, Trimotor fans
Last week I ordered the engine mount bolts, and they are in as of this morning. I am repairing the dishpans in order to prepare for engine installation.


Mike was kind enough (and strong enough) to fetch the old spars so that I could rob the various brackets in order to save some time making new ones.


Some will need to be made new, both because the new spars are a little different than the old, and because It makes no sense to drill out #8 rivets simply to install a bracket for a vacuum line. It's much easier to retrofit a simple bracket in some cases.


I understand that radios for this bird are on their way here, after stopping off at the avionics shop for a check. A plan will be hatched for what to install where after they get here.


My son Andrew is removing the brackets from the old spars, and fitting them to the the spars in the wing.